Bag Day
Tuesday was the last day of build season! Over the past week and the beginning of this week, we have worked very hard on finishing and finalizing the robot. Since the last blog, the robot has had some dramatic changes.
Bag Day / End of Build Season
On February 19, we had our bag day. On that day, we had to bag up our robot and we won’t be allowed to touch it or make changes to it until our first competition. However, we will have 6 hours of the week leading to our first competition to un-bag the robot and use it for practice and repairs.
We spent the final days leading up to bag day finalizing our robot (including some substantial last minute changes). The last couple nights, our main sponsor, AGR, opened up a part of their factory to finish up our robot and provides us with practice space.
Before bagging the robot, we had a chance to drive our robot around, practice, and test all of the mechanics. Roughly half of a competition field has been set up on the factory floor, affording us plenty of practice space for one robot.
We will continue meeting almost daily to work on our practice robot and prepare for our competitions. As stated in our previous blog, our first competition officially starts on March 9th (you can check blog #6 for details).
Mechanical
Our next step is to build a practice robot. It is exactly based on the competition bot, and will be used by the drive team to practice.
The ending configuration of our robot can be displayed in the following photo and diagram.


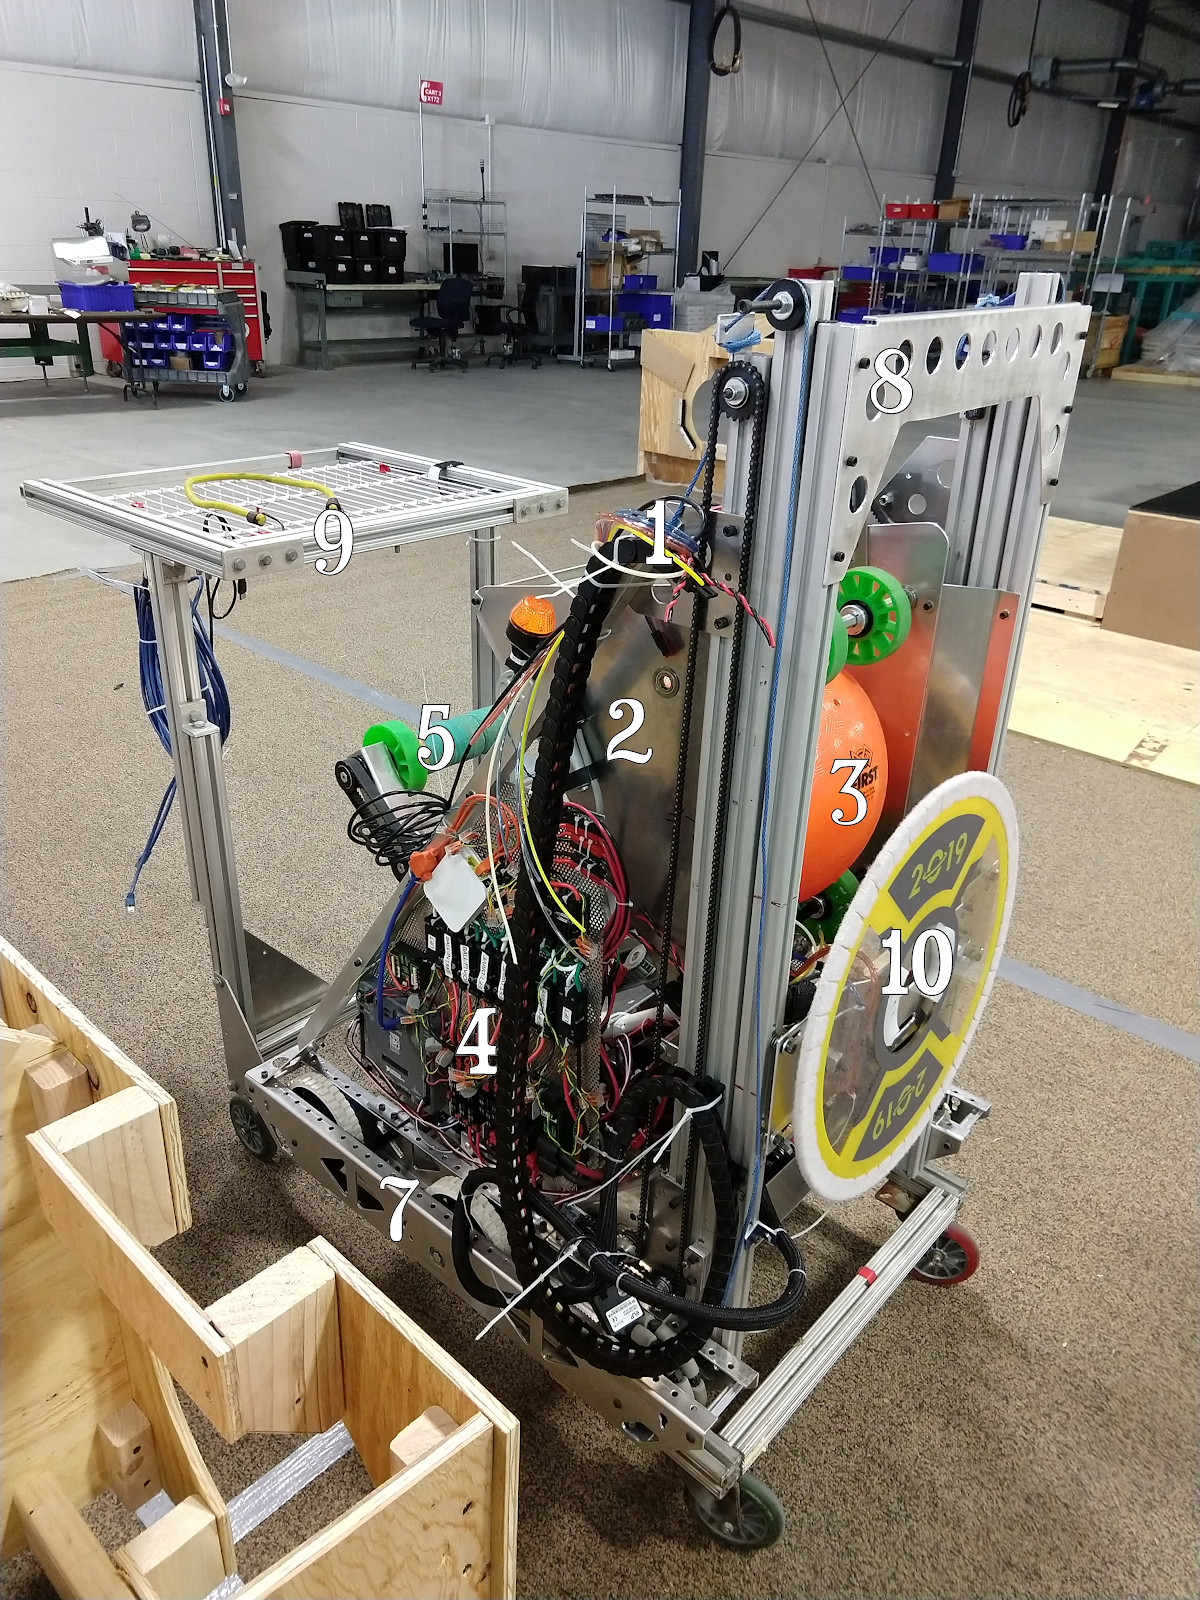
- A motor that powers the cargo (ball) basket of our robot. It is one out of many.
- The ball basket. A game piece from Destination: Deep Space, the cargo
- Our electrical, wires, and pneumatics as seen on both sides of the robot.
- The ramp and cargo pick-up.
- Battery slot.
- The drivetrain.
- The lift! This is one of the main parts of our robot.
- The cart to push the robot around at competitions.
- The hatch panel “grabber,” it also features hatch panel on it.
Each of the parts in these diagram pictures contribute to our robot in several ways. (1) it starts with a motor that controls our lift. (2) also located on the lift, is the cargo shooter. It is made of a triangular design that holds wheels in each corner, allowing the cargo to travel through it and shoot out with enough momentum and tension. (3) As seen in the picture, it picks up the cargo. (4) Our electrical and wire area that is located on each side of the robot. It houses the roboRIO (the brain), the start button, the radio, the power distribution panel, the motor controls, and the main pneumatics. (5) the cargo is conveyed to the shooter through the ramp that connects down to the floor. It sucks the ball in between two belts. Attached to the ramp, is the cargo pick-up system. This is a noodle drive system. It will drive to the cargo and bring it to the ramp, going up the lift and into the basket. (6) mounted on our drivetrain, is the battery box, which holds the battery safely on the robot. (7) our robot is able to move around the field using the drivetrain, and is about 32 inches in length. We use 1 mecha wheel and 2 HiGrip wheels per side. We have found this to be the best compromise between stability and good turning capabilities. (8) the lift of our robot is the primary feature of the bot. It is able to lift up to a full 9 feet, allowing us to place hatch panels and shoot cargo from a higher distance. As stated, the hatch panel grabber and the cargo basket are located on there. (9) our cart allows for easier relocation of our robot, it is primarily made out of maytec that was put together. (10) one part of the lift holds our hatch panel grabber and distributor. It uses pneumatics to open and close, either grabbing the hatch panel from the alliance station or placing it on the cargo ships or the rocket.